Overview
This example uses the WATCHDOG hardware library to register two 1 second timers that execute callback functions when the timers expire. The callback functions toggle the LEDs, and re-register the 1 second time-out, resulting in a repeating interval timer.
Required Hardware
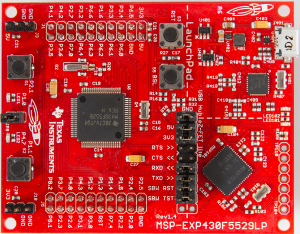
This example only requires the MSP430F5529LP development board.
Required Libraries
In order to build the example project, follow the instructions here for how to create and configure a new project. This example requires the following operating environment files:
- MSP430F5529LP.h
- MSP430F5529LP.gel
- MSP430F5529LP_CLOCK.h
- MSP430F5529LP_CLOCK.c
- MSP430F5529LP_WDT.h
- MSP430F5529LP_WDT.c
Example Code
The example code is provided as a main.c file that is available on GitHub at (Blink_LED_Watchdog_Timer), or if preferred, it can be cut-pasted from the window below.
/* ########################################################################## */ /* * This file was created by www.DavesMotleyProjects.com * * This software is provided under the following conditions: * Permission is hereby granted, free of charge, to any person obtaining * a copy of this software and associated documentation files (the * 'Software'), to deal in the Software without restriction, including * without limitation the rights to use, copy, modify, merge, publish, * distribute, sublicense, and/or sell copies of the Software, and to * permit persons to whom the Software is furnished to do so, subject to * the following conditions: * * THE SOFTWARE IS PROVIDED 'AS IS', WITHOUT WARRANTY OF ANY KIND, * EXPRESS OR IMPLIED, INCLUDING BUT NOT LIMITED TO THE WARRANTIES OF * MERCHANTABILITY, FITNESS FOR A PARTICULAR PURPOSE AND NONINFRINGEMENT. * IN NO EVENT SHALL THE AUTHORS OR COPYRIGHT HOLDERS BE LIABLE FOR ANY * CLAIM, DAMAGES OR OTHER LIABILITY, WHETHER IN AN ACTION OF CONTRACT, * TORT OR OTHERWISE, ARISING FROM, OUT OF OR IN CONNECTION WITH THE * SOFTWARE OR THE USE OR OTHER DEALINGS IN THE SOFTWARE. * */ /* ########################################################################## */ /* ===========================================================================*/ /* * This program blinks the LEDs on the Texas Instruments MSP430F5529 Launchpad * development board using the Watchdog Interval timer. This demonstrates how * the WDT Timer functions provided can be used to set long duration timeout * timers. In this example, two callback functions are registered with a * timeout value of 1 second, which then sets a flag used by the main loop to * trigger the toggling of the respective LED. Each time the registered timer * expires, it is re-registered for another 1 second period. This creates the * continuous blinking pattern. * * Although this example uses the minimum WDT Timer value of 1 second, the WDT * Timers are intended to be long duration timers. The maximum value of 65535 * is approx. 18 hours. * * Version 1.0 * * Rev. 1.0, Initial Release * Rev. 1.1, Minor editorial updates and cleanup * * */ /* ===========================================================================*/ #include "MSP430F5529LP.h" #include "MSP430F5529LP_CLOCK.h" #include "MSP430F5529LP_WDT.h" /****************************************************************************** PUBLIC DEFINITIONS ******************************************************************************/ /****************************************************************************** PUBLIC VARIABLES ******************************************************************************/ /****************************************************************************** PRIVATE DEFINITIONS (static const) ******************************************************************************/ /****************************************************************************** PRIVATE FUNCTION PROTOTYPES (static) ******************************************************************************/ static void initialize(void); static void LED1_timeout(void); static void LED2_timeout(void); /****************************************************************************** PRIVATE VARIABLES (static) ******************************************************************************/ /* These flags are set by the callback functions to indicate to the main * loop that it is time to perform an action. Although this example is very * small, and it would be possible to have the interrupt perform these * actions, it is good to get used to not performing too many tasks * within the interrupts. This makes it easier when the designs start * becoming very heavily interrupt driven. It is also very easy to forget * that interrupts are disabled inside the callback functions, and things * like timeouts or delays will not function. */ static uint16_t LED1_toggle_flag; static uint16_t LED2_toggle_flag; /****************************************************************************** Subroutine: main Description: program entry point at startup. Inputs: None Outputs: 0 ******************************************************************************/ int main( void ) { // perform initialization initialize(); for (;;) // Loop forever... { // If the LED1 toggle flag is set... if (LED1_toggle_flag) { LED1_toggle_flag = 0u; // Clear the flag P1OUT_bits.P1OUT0 ^= 1; // Toggle P1.0 (LED1) } // If the LED2 toggle flag is set... if (LED2_toggle_flag) { LED2_toggle_flag = 0u; // Clear the flag P4OUT_bits.P4OUT7 ^= 1; // Toggle P4.7 (LED2) } } return 0; } /****************************************************************************** Subroutine: initialize Description: Performs the initalization of the main program. This also initializes the MSP430F5529LP operating environment. Inputs: None Outputs: None ******************************************************************************/ static void initialize(void) { // ################################################################### // Add operating environment initialization here MSP430F5529LP_CLOCK_Initialize(); MSP430F5529LP_WDT_Initialize(); // ################################################################### // Add program specific initialization here // Enable the Debug LEDs P1DIR_bits.P1DIR0 = 1; // Set P1.0 (LED1) to an Output P4DIR_bits.P4DIR7 = 1; // Set P4.7 (LED2) to an Output P1OUT_bits.P1OUT0 = 0; // Set P1.0 initial value P4OUT_bits.P4OUT7 = 1; // Set P4.7 initial value // Initialize the variables LED1_toggle_flag = 0u; LED2_toggle_flag = 0u; // Register the initial WDT Timers at 1 second Set_WDT_Timer(0, 1, LED1_timeout); Set_WDT_Timer(1, 1, LED2_timeout); // ################################################################### // Last step before exiting, enable global interrupts __enable_interrupt(); } /****************************************************************************** Subroutine: LED1_timeout Description: This is the callback function for the LED1 WDT Timer Inputs: None Outputs: None ******************************************************************************/ static void LED1_timeout(void) { // Set the toggle flag. This lets the main loop know that it is time to // toggle the LED. Re-register the LED1 timer for another 1 second. LED1_toggle_flag = 1u; Set_WDT_Timer(0, 1, LED1_timeout); } /****************************************************************************** Subroutine: LED2_timeout Description: This is the callback function for the LED2 WDT Timer Inputs: None Outputs: None ******************************************************************************/ static void LED2_timeout(void) { // Set the toggle flag. This lets the main loop know that it is time to // toggle the LED. Re-register the LED2 timer for another 1 second. LED2_toggle_flag = 1u; Set_WDT_Timer(1, 1, LED2_timeout); } /****************************************************************************** End of File: main.c ******************************************************************************/ |
Initialization
In the example code, there are 3 main sections to the initialization. The first section is the initialization of the operating environment files, the second section includes application specific initialization, and finally the third section is the enable of the global interrupts. It is recommended that all projects using the operating environment follow this convention.
static void initialize(void)
{
    // ###################################################################
    // Add operating environment initialization here

    MSP430F5529LP_CLOCK_Initialize();
    MSP430F5529LP_WDT_Initialize();


    // ###################################################################
    // Add program specific initialization here

    // Enable the Debug LEDs
    P1DIR_bits.P1DIR0 = 1;         // Set P1.0 (LED1) to an Output
    P4DIR_bits.P4DIR7 = 1;         // Set P4.7 (LED2) to an Output
    P1OUT_bits.P1OUT0 = 0;         // Set P1.0 initial value
    P4OUT_bits.P4OUT7 = 1;         // Set P4.7 initial value

    // Initialize the variables
    LED1_toggle_flag = 0u;
    LED2_toggle_flag = 0u;

    // Register the initial WDT Timers at 1 second
    Set_WDT_Timer(0, 1, LED1_timeout);
    Set_WDT_Timer(1, 1, LED2_timeout);


    // ###################################################################
    // Last step before exiting, enable global interrupts

    __enable_interrupt();
}
Section 1 - initialization of the operating environment
Since the CLOCK and WDT library modules are included in this example, the initialization for these modules is performed in section one. The standard convention for the operating environment is that every library module includes an initialization function, and that function must be called before the module or its functions are used. The order of initialization is not important, except for the following rules:
- 1) CLOCK initialization is always required, and must always be initialized first.
- 2) hardware library modules must be initialized before accessory library modules.
- ...as with most rules there is always one exception.
- 3) The BUTTON library module is a hybrid of hardware and accessory. If used, it must be initialized as the last hardware module.
Section 2 - application specific initialization
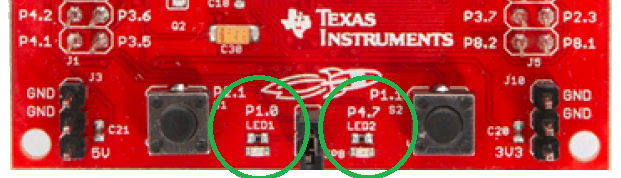
The applications specific initialization for this example includes 3 sub-sections. The first sets the pin direction for the two user-controllable LEDs. LED1 (Red) is connected to pin P1.0, and LED2 (Green) is connected to pin P4.7. The example code sets both of these pins as outputs (Direction = 1) and then sets the initial (Output) state. Notice that one LED is set to 0 (off) and the other to 1 (on). This will create an alternating LED pattern.
|
The next sub-section initializes two internal flags. These will be used to communicate the need to perform an action between the callback functions and the main loop.
Finally the last sub-section registers two timers using Set_WDT_Timer at indexes 0 and 1, with timeout values of 1 second, and the name of a callback function to be executed when the timer expires. Notice that the callback function includes only the function name, without parenthesis "()". This results in passing the address of the function. Registering these initial WDT timers is critical to kick-start the blinking process. This ensures that each of the LED timeout interrupts will be executed one time, when the timeout expires. Without this initial timer registration, nothing would happen.
Section 3 - enable global interrupts
The last sub-section simply enables the global interrupts. This should always be done as the last step during initialization, unless there is a very specific need to do it otherwise. The initialization of any interrupt driven library files will have enabled the interrupts for those modules, but they will not run until the global interrupts are enabled using __enable_interrupt();.
The Main Loop
The main function consists of a simple "forever loop" that monitors the value of two toggle flags. When either flag is found to be true, that flag is cleared, and the LED corresponding to that flag is toggled. Most of the time execution will spin through the main loop as fast as possible without any actions to perform. This type of continuously repeating main loop is a simple foundation that can be easily expanded to much more complicated projects, and is sufficient for most project needs.
Note: If the project requires very low power consumption, for example a battery powered project intended to operate for months, then this would not be the best approach. For example, if the only job of this processor was to blink these two LEDs (a bit boring), a more efficient implementation would be to put the processor to sleep after initialization, have the interrupts wake up the processor, toggle the LEDs, and then go back to sleep again. However, if the processor is part of a robot running DC motors, then the difference in power consumption between the two approaches would be like a raindrop to the ocean, in which case use the easiest approach.
int main( void )
{
    // perform initialization
    initialize();

    for (;;)    // Loop forever...
    {
        // If the LED1 toggle flag is set...
        if (LED1_toggle_flag)
        {
            LED1_toggle_flag = 0u;      // Clear the flag
            P1OUT_bits.P1OUT0 ^= 1;     // Toggle P1.0 (LED1)
        }
        // If the LED2 toggle flag is set...
        if (LED2_toggle_flag)
        {
            LED2_toggle_flag = 0u;      // Clear the flag
            P4OUT_bits.P4OUT7 ^= 1;     // Toggle P4.7 (LED2)
        }
    }

    return 0;
}
The Callback Functions
The callback functions are the link between the application code and the watchdog library. The watchdog library contains an interrupt service routine (ISR) that will execute once every second, and will decrement the timeout value for any active registered timers. When the timeout value reaches 0, the timer is disabled, and the callback function registered with that timer is executed one time. This means that by registering a watchdog timer, it is known that the callback function will be executed one time, at a predetermined time in the future. This is a very useful feature.
By using callback functions, the libraries can remain independent from the application. This allows the same library files to be linked between many projects, without having to create numerous copies. That is a nice feature. However, and this is important, because it looks like a regular function, it can be easy to forget that the callback functions execute in the context of an ISR. This means that interrupts are disabled inside the callback function. This has two important consequences. First, things like blocking delay functions that rely on interrupts to operate, will not work. Using something like this inside the callback function will cause the code to hang forever. Second, while executing inside the callback function, other interrupts will be prevented from executing. If those interrupts are time sensitive, staying in the callback function too long could have undesired side-effects.
Although this example is obviously simple, and the toggling of the LED could have been performed in the callback function, it is a good habit to only do what is absolutely necessary in the callback function, and do the rest of the processing in the main application.
The other action taken in the callback is to register a new timer. This ensures that the callback is called repeatedly.
static void LED1_timeout(void)
{
    // Set the toggle flag. This lets the main loop know that it is time to
    // toggle the LED. Re-register the LED1 timer for another 1 second.

    LED1_toggle_flag = 1u;
    Set_WDT_Timer(0, 1, LED1_timeout);
}
The End Result
Once the example code is built and executed, the end result should be Red and Green LEDs alternating every second, as shown below.
|
Now that the example code is up an running, consider changing a few things an see what happens. For example:
- Change the initial output state of the LEDs to be the same.
- Change one of the initial timer registrations to have a longer timeout, like 5 seconds.
- Change one of the timer re-registrations in the callback function to have a longer timeout.